Showing posts with label How-to. Show all posts

How to enable Whatsapp Disappearing Messages in Android and Iphone

Posted On // Leave a Comment

Hello Everyone! Whatsapp has added one more new feature recently. Its about Whatsapp Disappearing messages. So in this I would like to explain about what is Whatsapp Disappearing messages and how to enable Whatsapp Disappearing Messages in Android and Iphone.

What is Whatsapp Disappearing messages?

Whatsapp Disappearing messages is a feature that automatically erases your WhatsApp messages after a certain period of time. This new feature is now available for everyone.  

How to enable Whatsapp Disappearing Messages in Android and Iphone?

1) Open Whatsapp chat (any individual).

2)  Tap Contact Info.

3) Scroll down and you will see Disappearing Messages feature ().

4) It will be disabled by default. Now you can enable this feature by: Click Continue, followed by Selecting On to enable this feature.

5) You can enable this feature to which individual you want to enable.

In case of group chat, only group admins can turn disappearing messages on or off.

 If you have any queries you can post the same in the comments. Also you can go through the list of details given in the FAQ in the official Whatsapp website. 

Share this Post
[Read more]

DNS PROBE FINISHED NXDOMAIN error : How to Fix (solved)

Posted On // Leave a Comment
                  If you are getting the error DNS_PROBE_FINISHED_NXDOMAIN and looking for solution then this post will guide you how to fix DNS PROBE FINISHED NXDOMAIN error while using in chrome or Firefox.

The server at any website can’t be found, because the DNS lookup failed. DNS is the network service that translates a website’s name to its Internet address. This error is most often caused by having no connection to the Internet or a misconfigured network. It can also be caused by an unresponsive DNS server or a firewall preventing Google Chrome from accessing the network.
Screenshot of  DNS_PROBE_FINISHED_NXDOMAIN chrome

Let's look for the solution for this DNS_PROBE_FINISHED_NXDOMAIN error. There are 3 ways to solve this error.

Method 1 : Change the DNS Address


  1. Open Network and Sharing Center using right click on Network Icon.
  2. Now click Change adapter settings
  3. Now right click on your Network Connection (Active) and click properties
  4. Now select Internet Protocol Version 4 (TCP/IPv4)” and click Properties.
  5. Now click Use the following DNS server addresses:
  6. Enter the following in your DNS server.

  1. Preferred DNS Server: 8.8.8.8
  2. Alternate DNS Server: 8.8.4.4


Method 2 : Using Command Prompt

Run CMD as admin.\
Now run the following Command

ipconfig /release
ipconfig /all
ipconfig /flushdns
ipconfig /renew                                        
netsh int ip set dns
netsh winsock reset
Now restart your PC. 

Hope this post will be useful for you in guiding How to fix DNS PROBE FINISHED NXDOMAIN error in Chrome.

Share this Post
[Read more]

“The reference to entity XX must end with the ‘;’ delimiter” XML ERROR : How to fix

Posted On // Leave a Comment

                  You may get a error “The reference to entity X must end with the ‘;’ delimiter” This is XML ERROR. 

                  Mostly this error occurs when you are editing blogger html or adding third party widget. You may be wondering how to fix this error and this is really simple to fix. 

            X may be title or whatever it may. Fixing this is XML error is really simple. I too get this error and fix it easily.


Just replace “&” with “&” in your HTML/Javascript code!
                    

Here is an example
  • Original Code:
    <!– Begin Code –>
    <script src="http://techenol.blogspot.com/XXX.php?sid=XXX&br=XXX&dk=XXXXXXXXXXXX" type="text/javascript"/>
    <!– End Code –>
  • Altered Code:
    <!– Begin Code –>
    <script src="http://techenol.blogspot.com/XXX.php?sid=XXX&amp;br=XXX&amp;dk=XXXXXXXXXXXX" type="text/javascript"/>
    <!– End Code –>
                 And you have done it. Quite simple. Hope this helped you a lot. Please share this post if you find it helpful.

Share this Post
[Read more]

Add Beautiful social subscription widget to your Blogger

Posted On // Leave a Comment
      This post will guide you how to install a beautiful social subscription widget to your blogger.  Social subscription button is a very important tool / widget to not only blogger but to any website. With social networks you can interact with your readers which is a very important thing. This will also help the visitors to spread your blog / website. And the result you will get traffic in an increasing manner. There are numerous design you can add this social subscription widget. One of them is below.

      This widget has RSS feed, Twitter, Facebook, Google+, Linked In and YouTube. This widget looks elegant. Here is the Demo.


Now lets see how to add this widget to blogger

1) Go to blogger Dashboard

2) Now go to layout

3) Click add a widget where you want to add it.

4) Select Html javascript

5) Copy the code below and paste it.

6) Now change the username to your blogger name. 

<div class="btnt-chronicl-social"><ul><li><a class="rss"href="http://feeds.feedburner.com/techenol">Subscribe to the RSS Feed</a></li> <li><a class="twitter" href="https://twitter.com/techenol">Follow me on Twitter</a></li> <li><a class="facebook"href="https://www.facebook.com/techenol">Find me on Facebook</a></li> <li><aclass="google" href="https://plus.google.com/106358629644984191882rel="author">Join me on Google+</a></li> <li><a class="linkedin" href="http://in.linkedin.com/your url">Connect with me on LinkedIn</a></li> <li><a class="youtube"href="http://www.youtube.com/user/techenol">Watch me on YouTube</a></li>
</ul></div><style type="text/css">.btnt-chronicl-social { width: 100%; } .btnt-chronicl-social ul { border: 1px solid #CCCCCC; margin: 0; padding: 0; } .btnt-chronicl-social ul li { list-style:none; padding: 0; text-transform: none; border-bottom: 1px solid #CCCCCC; border-top: 1px solid #FFFFFF; } .btnt-chronicl-social ul li:first-child { border-top: 0 none; } .btnt-chronicl-social ul li:last-child { border-bottom: 0 none; } .btnt-chronicl-social ul li a { background-color: #F2F2F2 !important; color: #404040; display:block; } .btnt-chronicl-social ul li a:hover { background-color: #fafafa !important; } .btnt-chronicl-social ul li .rss { background: url("http://i1203.photobucket.com/albums/bb382/chandeep10/social-icons/RSS-1.png") no-repeat scroll 10px center #F87E12; padding: 17.5px 60px; } .btnt-chronicl-social ul li .twitter { background: url("http://i1203.photobucket.com/albums/bb382/chandeep10/social-icons/Twitter.png") no-repeat scroll 10px center #4CACEE; padding: 17.5px 60px;} .btnt-chronicl-social ul li .facebook { background: url("http://i1203.photobucket.com/albums/bb382/chandeep10/social-icons/Facebook-1.png") no-repeat scroll 10px center #3B5998; padding: 17.5px 60px; } .btnt-chronicl-social ul li .google { background: url("http://i1203.photobucket.com/albums/bb382/chandeep10/social-icons/google.png") no-repeat scroll 10px center #D44937; padding: 17.5px 60px; } .btnt-chronicl-social ul li .linkedin { background: url("http://i1203.photobucket.com/albums/bb382/chandeep10/social-icons/LinkedIn-1.png") no-repeat scroll 10px center #3692C3; padding: 17.5px 60px; } .btnt-chronicl-social ul li .youtube { background: url("http://i1203.photobucket.com/albums/bb382/chandeep10/social-icons/Youtube-1.png") no-repeat scroll 10px center #C6312B; padding: 17.5px 60px; } .social-about { display: none; }</style>


         That's all. And now you have added a beautiful social bookmarking widget. If you find it useful, then share this post with your friends.


Share this Post
[Read more]

Download all your Facebook Data : How to

Posted On // Leave a Comment

          Facebook is one of the most inevitable website these days especially for the youths. Everybody will log in to Facebook often. Sometimes more than twice or even thrice a day. People share photos , videos, update status and much more.

          Do you know? You can download Facebook Data. Yes you can download the photos, videos, wall post and messages. Facebook gives you that option. Let's see how you can download facebook archives.


How to download Facebook Archives :

 1) Log in to your Facebook account.

 2) Go to the settings ( click the top right corner icon )

 3) Now click the link Download a copy of your Facebook data.( below the general settings )

 4) Now you can start downloading your Facebook archives.


  5) Next you will see request my download pop up saying that Facebook takes time for download.


You may also like How to prevent Facebook account from hacking

                 And that's all. You are done. Facebook will take some time for the download. You will receive an e-mail when the download is ready.

                  Hope you enjoyed this post.   

Share this Post
[Read more]

Integrate Blogger App in Hootsuite - how to

Posted On // Leave a Comment
             This blog post will guide you in integration of Blogger with Hootsuite. This integration has been the latest development in Blogger. Let's get into it in detail.


             Everybody must be aware of Blogger. So no need of any explanation about it. But everybody may not be aware of Hootsuite. So your first question may be What is Hootsuite ?


What is Hootsuite ?
Hootsuite is a Social Media Management. You can analyse the social media traffic there. You can schedule the messages and tweets. Pricing are Free, Pro and Enterprise.


How to connect Blogger in Hootsuite ?
              The connection process is so simple. It will take just a minute or two. Just follow the steps.

Step 1 : Sign up for a Hootsuite account.

Step 2 : Now visit Hootsuite's app directory.
Step 3Now scroll down untill you see the Blogger App and click install it.
               And you have now connected your blog with Hootsuite.


               Hootsuite recently held a Hangout in Blogger about this integration and they also gave a live demo of integration of Blogger with Hootsuite. Here is a video of that Hangout incase you missed it


                       Hope you enjoyed this article. If you have any doubts relating to this just leave a comment. I will meet you with a fresh article.
Share this Post
[Read more]

How to increase Privacy with Google

Posted On // Leave a Comment
                Google - The Most popular search engine in the world. Always privacy is most important to a user. After reading this how-to post, you will be able to increase privacy in Google.


How to increase Privacy with Google ?

         1) Visit Google web page history. ( you should sign in )
 
         2) Now you can pause or turn off web history.  Here you can also remove your past web history you searched before.

         3) Then visit Ad preferences. Here you can see two options :  i) Ads on search and gmail, (ii) Ads on Web. You can opt out in both the cases.


Tip :

Use Incognito Browsing while using Google Chrome Browser.

Similarly search in private mode in internet explorer

Also search in private mode in Firfox.

While you are searching in Google, stay signed out of Google as much as possible.

            Hope this How-to post is useful for you. Happy searching....
[Read more]

Type Indian Rupee Symbol in MS Word using Keyboard

Posted On // Leave a Comment

      You all will be aware of the fact that Indian Rupee has got a official symbol. So you may be willing to type the Indian Rupee symbol. If you know how to type Indian Rupee Symbol in MS Word, then ignore this post. If not go ahead. You  can type this symbol in MS Word. For this you have to download the Font. Let's see how it works.


 How To install Indian Rupee Font ?

1 ) Download the Indian Rupee Font Click Here.

2 ) Copy the file to C:\Windows\Fonts directory.(for Windows XP users) 

3 ) Right-click the file and choose “Install”. (for Windows 7/Vista users)

 That's all. And you have installed the Rupee Font. 

 Now Open the Microsoft Word.
 Go to the Font Section and click the font named "Rupee Foradian"


 Now Click the tilde button to type Indian Rupee Symbol ( ~ )
 
       Please note that this font is available only when it is installed in the computer. If you type this in a document and open it in other computer where the font is not installed, then the symbol cannot be viewed. 

       Hope this post is useful to you.  

 
[Read more]

Enable / Disable cookies in Internet Explorer 10

Posted On // Leave a Comment
       This is a how-to post about enabling or disabling cookies in Internet explorer 10. IE 10 is the default browser in Windows 8. enabling or disabling cookies in Internet explorer 10 is so simple. Just follow the tutorial below.

      1) Go to your desktop ( Windows key + M )


      2) Now right click LAN icon in the desktop in the right bottom corner.Click network and sharing centre.


      3) Now at the left bottom click internet options.   


      4) Now a pop-up window opens click Privacy tab in that window.

      5) If you want  to disable cookies drag the bar upwards. If you want to enable cookies drag it towards down. ( It will in medium by default )

[Read more]

How to unsubscribe spam mails automatically

Posted On // Leave a Comment
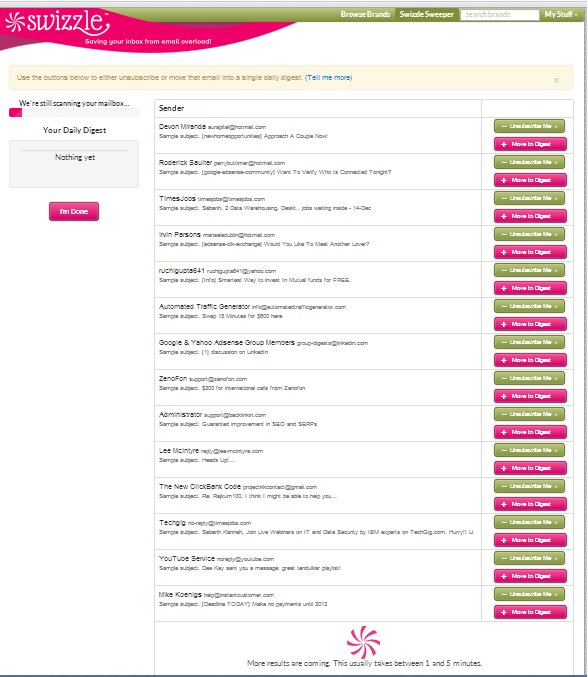
           If you are using e-mail regularly, you may get tons of e-mail filling up your inbox or spam. If it is in the inbox it may be a spam mail. So you may end up with frustration. And you have a solution to this. Yes you can unsubscribe these using Swizzle, which is a inbox manager.This how-to post will guide you and just a few steps and you are done.


1) Visit Swizzle website.
2) Enter your e-mail id in the space provided and click go 

 3) Now enter the username and password of your username in the respective boxes.Then click Lets go.

 3) It will scan and after scanning you just Click Unsubscribe if you want to unsubscribe from a list or click st move to digest if you don't want to unsubscribe.


4) If you want to unsubscribe, you are given two options. One is unsubscribe and the other is unsubscribe and delete all.

        Is Swizzle safe and secure?
                       Yes it's safe and secure. It has good reviews. So you need not worry about the safety and security.

         Start using swizzle right now and save your inbox from e-mail overload.

[Read more]

Call free from mobile using Viber over 3G or wifi

Posted On // Leave a Comment
       
            How to make free calls? Is this your  question, then here is your solution.  

            Call free to other mobile using Viber. You can use it over 3G or wifi. It's 100% free to use.


           The Red box indicates the platform Viber supports. Select yours.

           The Blue oval is what you should click after selecting your platform.


           Vibers supports 6 platforms :

                   1) IOS

                   2) Android

                   3) Windows Phone

                   4) Blackberry

                   5) Nokia

                   6) Bada

           Features of  Viber :

                   Ad-Free

                   Best Sound quality


                           So why are you waiting for...Just download and make free calls and save your money.          
[Read more]

Enable Private browsing (incognito browsing) in Google Chrome

Posted On // Leave a Comment
          This is an article on how-to enable private browsing in Google Chrome. This involves just a few simple steps.

          1)  Click on the customize icon in Google Chrome ( At top right of Google Chrome ).


          2) Then click " New Incognito Window " Button on the menu. ( Click on the picture for larger View )


          3) A new window will open.


[Read more]

How to enable private browsing in Internet Explorer

Posted On // Leave a Comment
              Yet another how-to guide from techenol on how to enabling private browsing in Internet explorer. (with screenshots )


              To browse anonymously using internet explorer you have to enable private browsing in internet explorer. 

               Shortcut Key - ctrl + Shift + P or

             1) Open your Internet Explorer browser.

             2) Now click on the settings tab button. ( Click on the picture for larger View )


             3) Safety tab and then click InPrivate Browsing.

             4) Then a new tab will open.


               Now start browsing in private mode.

[Read more]

How to change Google Chrome browser's default search engine

Posted On // Leave a Comment
          In Google chrome browser, Google will be the default search engine. But you can easily change it with some simple steps. You can make any search engine. Even you can make your own website as default search engine. ( with screenshots ) 

     1) First Go to Google Chrome settings.

     2) Then click settings tab.


     3) Just scroll down to Search 


     4) Click manage search engine in it.

     5) Add you website to it. 


          And that it. So simple. Change the search engine with your search engine. 
[Read more]

How to Schedule Emails to send later in Gmail

Posted On // Leave a Comment
       This is one of the best How-to Guide from the Techenol Blog. This will help you in scheduling your Gmail to send it later. You need an extension to do this e-mail reminder. The extension is BoomeranG for Gmail.

Boomerang for Gmail works on Following Browsers

       This extension is available for Firefox, Google Chrome and Safari.

Features of Boomerang For Gmail :

      Send an e-mail later :

                    You can send an e-mail later. You can choose it from a list.( as shown in screenshot )
  
    Customize the e-mail you receive : 

                    You can take a e-mail from your inbox if you don't want it and if you are in need of that e-mail you can bring back it to your inbox. Sounds great.

      This has been really a boon for many e-mail readers. Start installing it in your browsers by Clicking here

      Start scheduling your e-mails right now :)

   
[Read more]

How to replace "Newer Post / Older Post" with Post Title in Blogger

Posted On // Leave a Comment
    Most of the blogs will have Older Posts or Newer Posts after the article or in the footer section.

  You can replace it with post titles by following some simple steps.


1)  Sign in to your Blogger Dashboard.

2) Click on the blog you want to change ( In case you have more than one blog )

3) Click on template.

4) Take a back up of the template and then proceed.

5) Now click "edit HTML" and proceed.

6) Find </head> ( Use CTRL+F )

7) Paste the code given below in the box above </head>
<script type="text/javascript" src="http://ajax.googleapis.com/ajax/libs/jquery/1.4.4/jquery.min.js"></script>
8) Save the Template.

9) Now go to the Layout.

10) Click " add gadget " and click " HTML/Javascript "

11) Now copy the code below and paste it in the gadget and save it.


<style type="text/css"> #blog-pager-newer-link {font-size:85%;width:200px;text-align:left;}
#blog-pager-older-link {font-size:85%;width:200px;text-align:right;}
</style>
<script type="text/javascript">
$(document).ready(function(){
var newerLink = $("a.blog-pager-newer-link").attr("href");
$("a.blog-pager-newer-link").load(newerLink+" .post-title:first", function() {
var newerLinkTitle = $("a.blog-pager-newer-link").text();
$("a.blog-pager-newer-link").text("<< " + newerLinkTitle);
});
var olderLink = $("a.blog-pager-older-link").attr("href");
$("a.blog-pager-older-link").load(olderLink+" .post-title:first", function() {
var olderLinkTitle = $("a.blog-pager-older-link").text();
$("a.blog-pager-older-link").text(olderLinkTitle + " >>");//rgt
});
});
</script>
12) Now you will see the Post title instead of Older and newer post as shown below in the screenshot.


                Hope you like this how-to guide. Meet you with another post. 
[Read more]

Get Free Backlinks for your Blog / Website

Posted On // Leave a Comment
  This article will guide you in getting some back links for you for free. Back links is very important for a blog or website.

Step by step guide in getting free backlinks for you.

 1) Visit http://www.imtalk.org/cmps_index.php?pageid=IMT-Website-Submitter

 2) Enter your Website link or blog link

 3) After giving the details click Submit button. It will start creating back links.

  Thats it. Start getting backlinks for your website for free :) 
[Read more]

How to prevent Facebook account from hacking

Posted On // Leave a Comment
      Nowadays many Facebook accounts are being hacked and you may be aware of it. You need to be very careful in protecting your Facebook account. So please follow some simple steps to protect your Facebook Account.

      Here are some simple tips to protect your Facebook Account


1) HAVE A STRONG PASSWORD
                     
                  Always have a strong password with special characters and alpha numeric keys. This will be useful in protecting your account. Don't simply use a word or name or Date of Birth. It is advisable to use both capital and small letter in your password. Have a unique password. It should not be used by you for others such as e-mail or other social networking sites.

 2) USE PRIVATE BROWSING

                   Use private browsing. When you log out then just delete the cookies. Don't click Remember Me.

 3) CHANGE YOUR PASSWORD FREQUENTLY

                   Change your password at least once in a month. You can change it in account settings or simply click forget password.

 4) DON'T ADD EVERYONE AS YOUR FRIEND

                   Don't simply accept all the friend request you get. This is very important one. Accept only the person you know. Because most of the people are accepting all the request they get.

 5) DON'T CLICK ON THE LINKS THAT ARE NOT TRUSTWORTHY

                  While you log in to your facebook account don't click the links that you see in facebook. Because all the links are not trustworthy. Similarly always log in to your Facebook from the Facebook home page. Don't click on the links that you get to your mail and log in.

     
   Hope this article is useful for you. Protect your Facebook Account...  
[Read more]

How to create Facebook Timeline video

Posted On // Leave a Comment
                In this post, we will just see how to create facebook timeline video. This post will be useful for you to convert your Facebook timeline into a Timeline video. It's free and simple. You can use it for your profile as well as for your Facebook Page.

 Just Visit www.timelinemoviemaker.com


  Click Make your Movie.

  Allow acces to the app.

  You will need atleast 50 photos.

  To create video for your Facebook page, Click the link below Make your Movie.

         Start making your own Facebook Timeline Video :)   

[Read more]